![]()
![]()
最近タスク管理やメモアプリとして人気があるNotionですが、2022年3月にAPIが正式にリリースされました。
今回はNotionをデータベースとして利用し、Nuxt.jsでデータを取得する使い方をTodoアプリ構築で実践してみたいと思います!
※Todoアプリは、シンプルなCRUD(Create:生成・Read:読み取り・Update:更新・Delete:削除)操作を体験できるので、基礎的な学習にはとても向いています。
Notion API : https://developers.notion.com/
Notionのデータベースページ等をJSON形式で取得できるAPIです。
データベースページに対してCRUD操作を一通り行うことができます。
Nuxt.js : https://nuxtjs.org/
Vue.jsの開発をより早く、簡単にするために作られたフレームワークです。
サーバーサイドレンダリングやアプリケーションの構築自体もシンプルに行うことができ、静的サイトジェネレータとしての機能も有します。
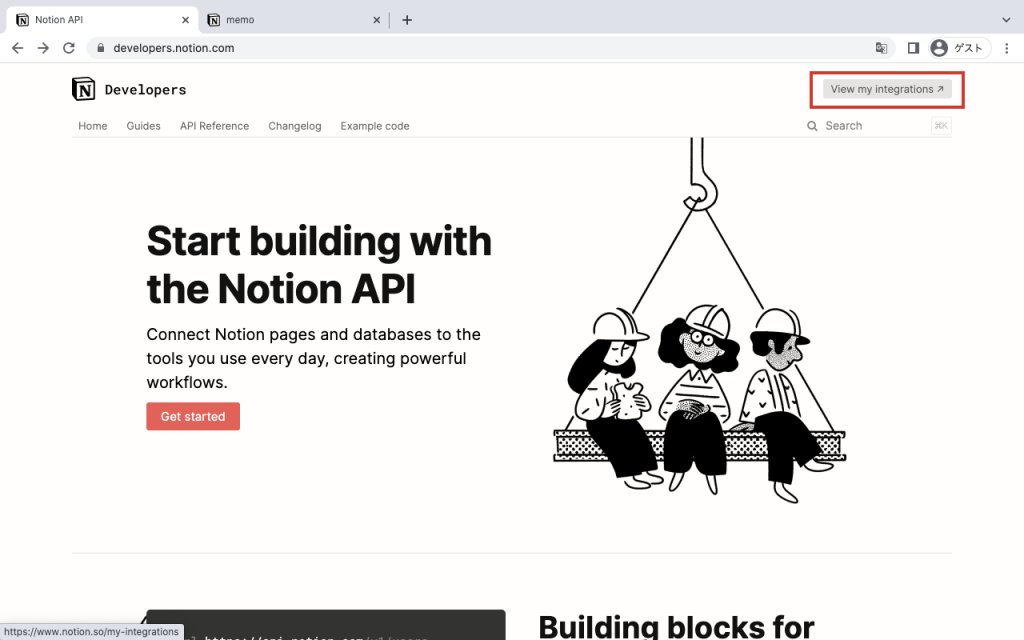
Notion API : https://developers.notion.com/
上記URLにアクセスし、画面右上にある View my integrations に進みます。
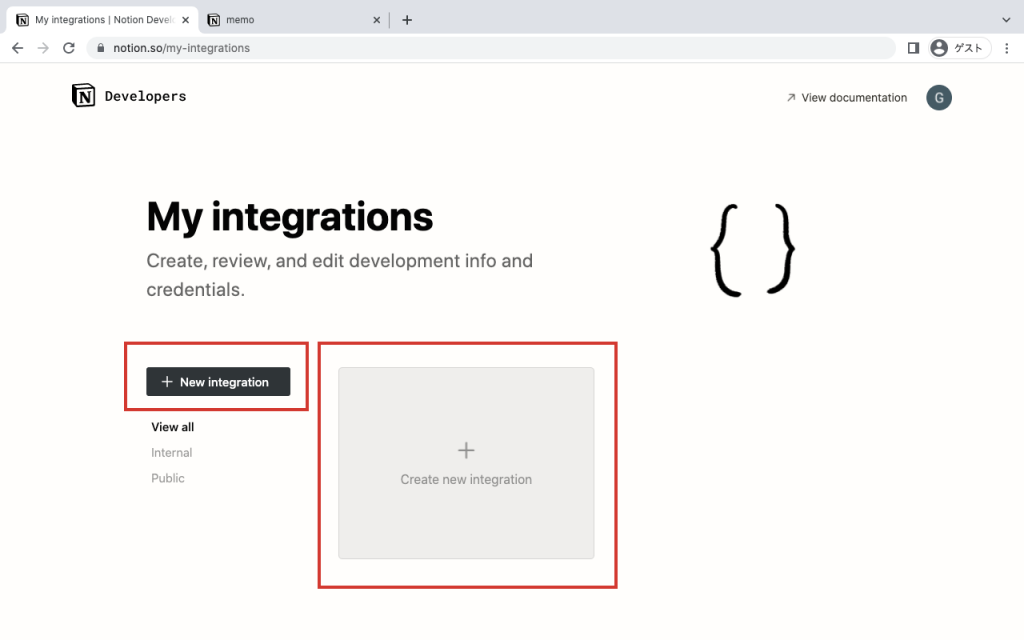
次に New integration か Create new integration をクリックします。
(最近Notionが日本語対応になったので、日本語表記になっているかもしれません)
Basic Information というページに遷移するので、ここでは今回利用するAPIの設定をします。
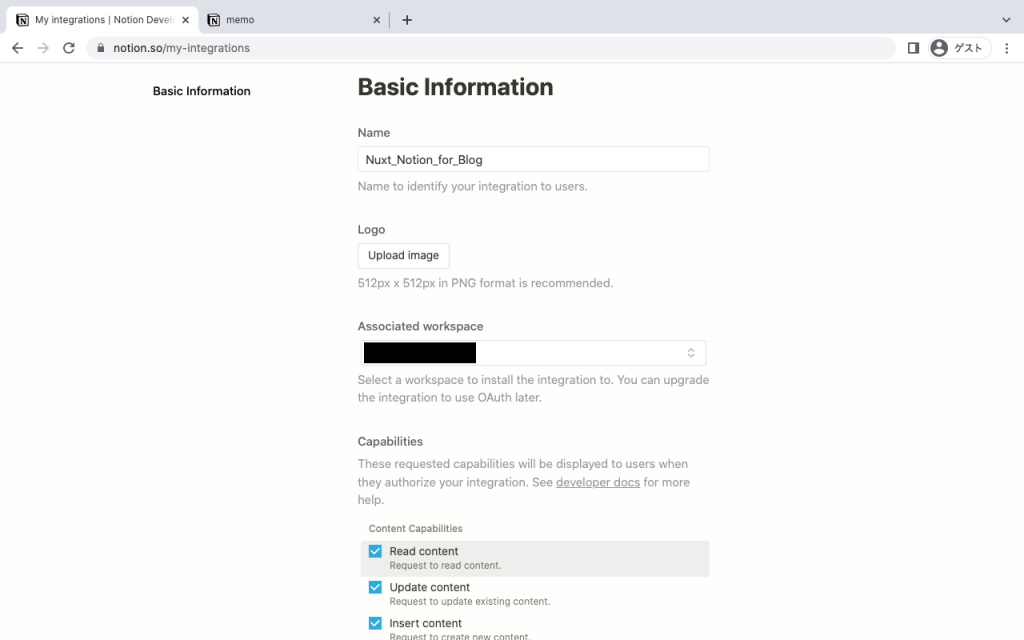
今回の作成するAPIでは、Nameは自由、他はデフォルトの設定のままで問題ありません。
(Associated Workspaceについては今回利用するアカウントになっているかだけ確認してください)
その後、画面下にある Submit をクリックします。
すると Secrets という画面に遷移したと思います。
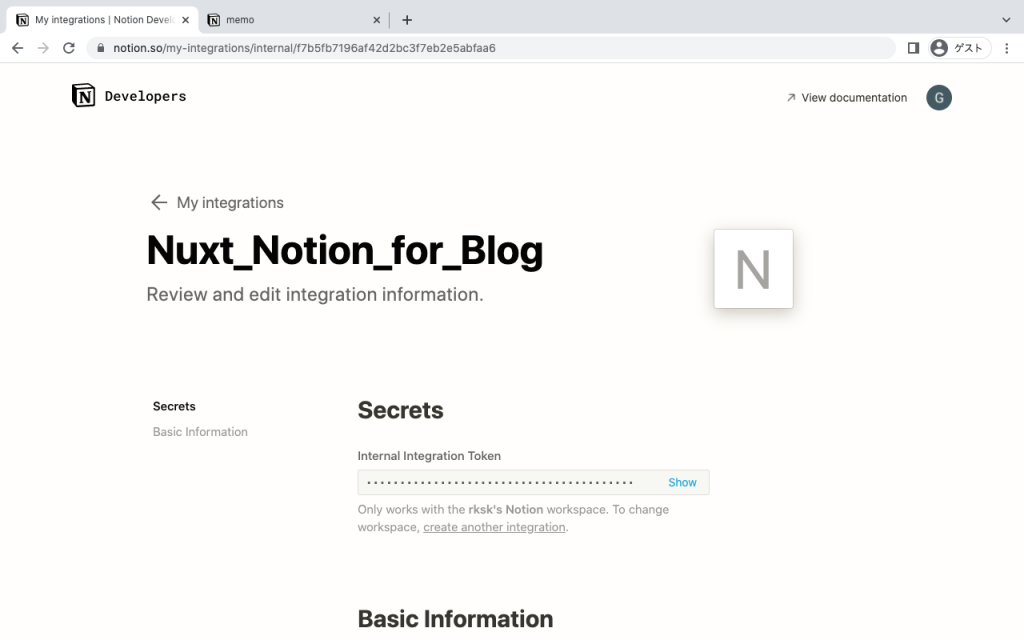
次の「Notionページ作成」の手順で Internal Integration Token を使うので、 一旦このSecretsページはこのままにしておきます。
Notion : https://www.notion.so/
ブラウザで別のタブを開き、自身のNotionを開きます。
自身のNotionが表示されたら画面左下の + New Page をクリックします。
タイトルはお好みで問題ありません。
この記事では「Nuxt_Notion_for_Blog」にしておきます。
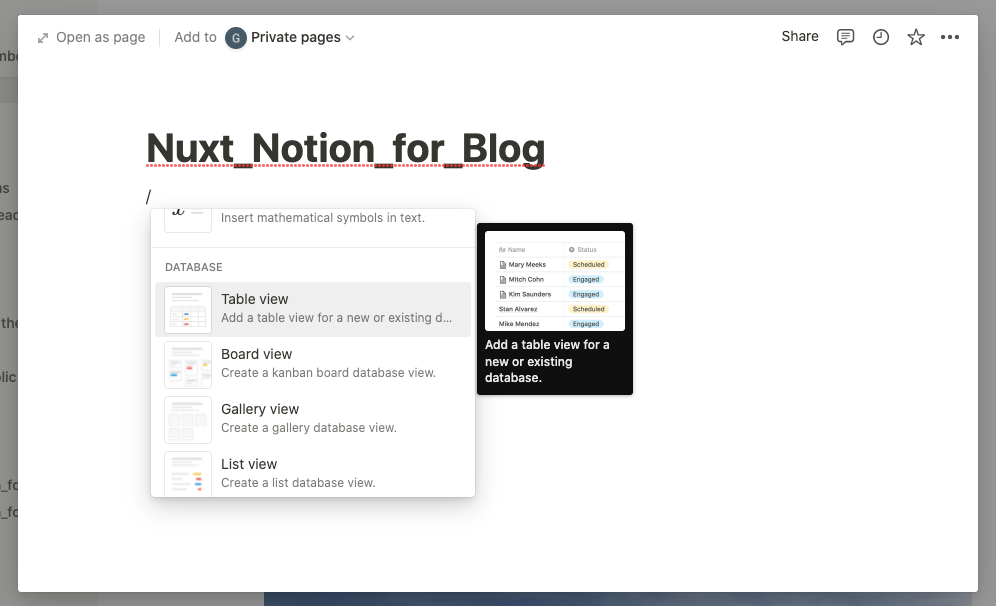
続いて本文で「/」を入力するとテンプレートを設定するポップアップが表示されます。
そこで中段あたりの、DATABASE のすぐ下にある Table View を選択します。
すると下記画像のような表示になるので、右下の + New Database をクリックします。
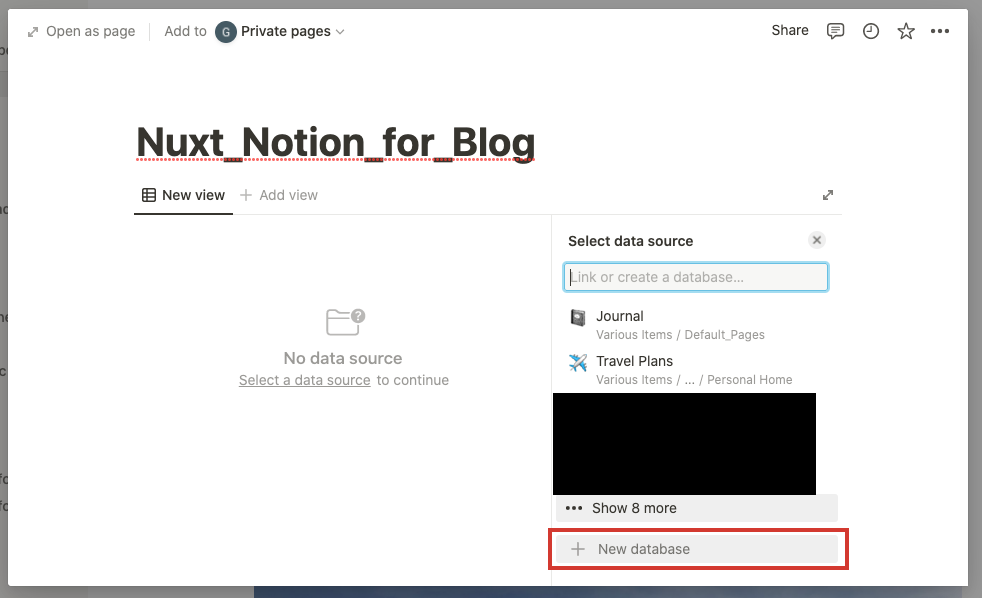
テーブル形式の画面が表示されるはずなので、画面左上 Open as page をクリックします。
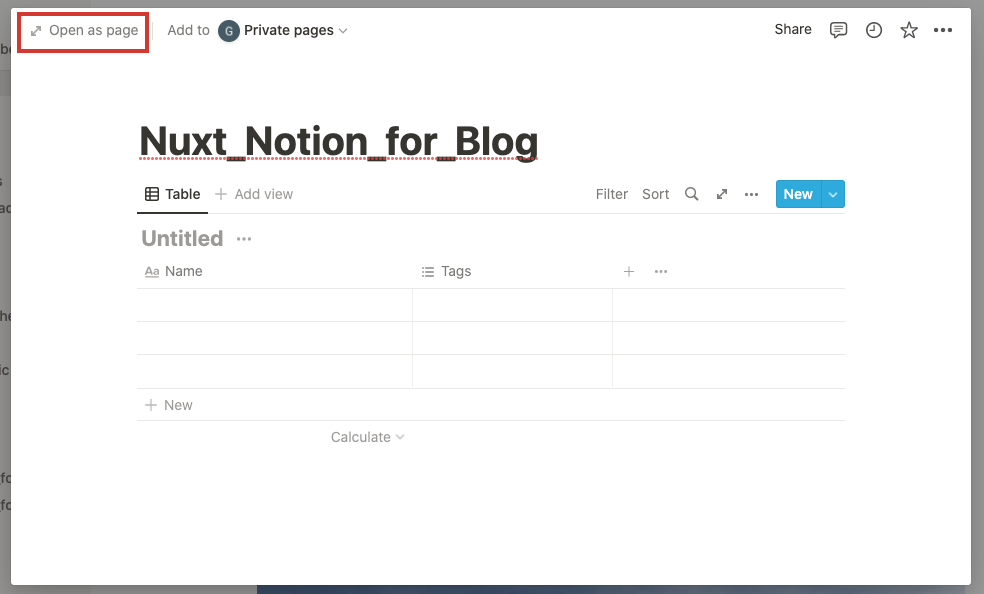
テーブルには好きなように入力しておいてください。
後ほど情報取得確認に利用します。
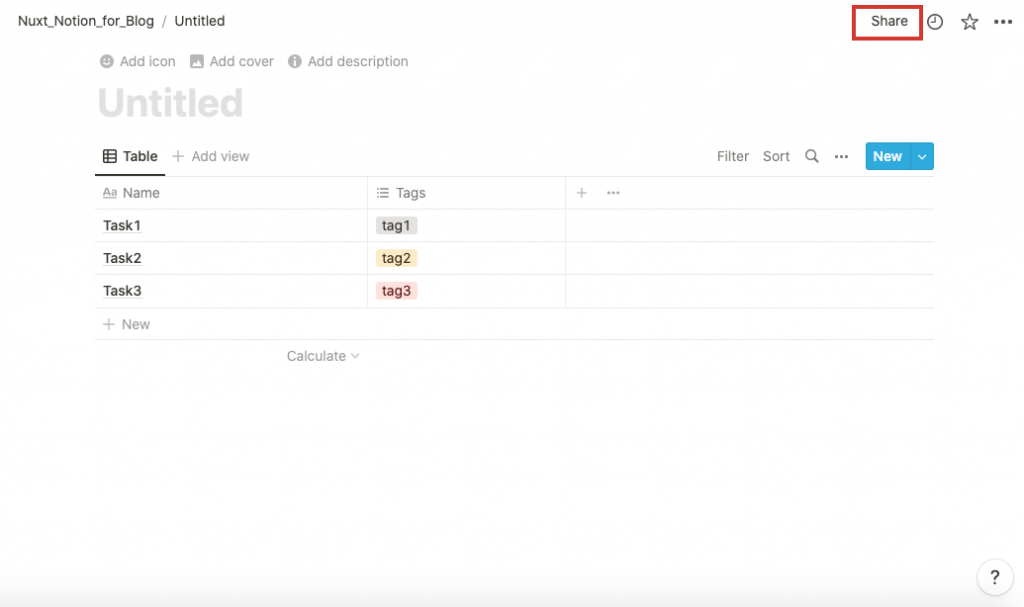
その後、右上の share → Invite をクリックし、先ほど作成したAPI ( Integration )が表示されるのでそちらを選択します。
少し長かったですが、これでNotion側の作業は完了です。
お好みのディレクトリでcreate-nuxt-appを実行します。
npx create-nuxt-app nuxt_notion※npxが使えない場合、npmのバージョンが古いかもしれません。(npxはnpm 5.2.0以上で利用できます)
いくつか質問されますので今回は下記のように設定します。
create-nuxt-app v4.0.0
✨  Generating Nuxt.js project in nuxt_notion
? Project name: nuxt_notion
? Programming language: JavaScript
? Package manager: Npm
? UI framework: None
? Nuxt.js modules: Axios - Promise based HTTP client
? Linting tools: (Press <space> to select, <a> to toggle all, <i> to invert selection)
? Testing framework: None
? Rendering mode: Universal (SSR / SSG)
? Deployment target: Server (Node.js hosting)
? Development tools: (Press <space> to select, <a> to toggle all, <i> to invert selection)
? What is your GitHub username?
※ (Press <space> to select... となっている箇所は何も選択せずEnterで進んでください。
少し時間がかかりますが、これで初期設定状態のNuxtアプリが作成されます。
下記でブラウザにNuxt.jsの画面が表示されれば成功です。
cd nuxt_notion
npm run dev
確認できたら、一旦 ctrl + c で停止してください。
まず nuxt_notionディレクトリ直下に .env ファイルを作成します。
(.envは公開すべきではないファイルなので、Git管理する際は.envファイルは除外してください)
NOTION_TOKEN = 最初に作成したSecretsページのInternal Integration Token
DATABASE_ID  = データベースID (下で説明しています)
データベースIDはデータベースページのURL内に含まれています。 下記の*****の部分がデータベースIDです。
https://www.notion.so/*****?v=123456789>Notion APIでは便利なパッケージが用意されているので npm でインストールしてください。
npm install @notionhq/client今回、最低限のデザインとしてBootstrapを利用するのでNuxt.config.jsを開き下記のように追記してください。 初期状態では16行目あたりに追記することになります。
link: [
  { rel: 'icon', type: 'image/x-icon', href: '/favicon.ico' },
  {
    rel: 'stylesheet',
    href: '<https://stackpath.bootstrapcdn.com/bootstrap/4.5.0/css/bootstrap.min.css>'
  }
]
ここまでの作業はとても長かったですが、
ここでやっとNotion APIからデータを取得し、画面に出力します!
pages/index.vue を下記のように記述します。
<template>
  <ul class="list-group w-50 m-auto p-3">
    <li v-for="item in results"
        :key="item.id"
        :id="item.id"
        class="list-group-item d-flex align-items-center justify-content-between">
      <p contenteditable class="mb-0">{{item.properties.Name.title[0].text.content}}</p>
      <button @click="updateItem" class="btn btn-info flex-shrink-0">更新</button>
    </li>
  </ul>
</template>

<script>
import { Client } from '@notionhq/client';
const notion = new Client({auth: process.env.NOTION_TOKEN});

export default {
  async asyncData() {
    const myPage = await notion.databases.query({
      database_id: process.env.DATABASE_ID,
    })
    return myPage
  }
}
</script>
※buttonタグにある@click属性のupdate関数は後で実装します。
※asyncData内でreturnしているmyPageには下記のようなオブジェクトが格納されており、resultsにtodoタスクが配列で格納されています。
{
  object: 'list',
  results: [
    {
      object: 'page',
      id: '...',
      created_time: '2022-05-08T06:29:00.000Z',
      last_edited_time: '2022-05-08T06:29:00.000Z',
      created_by: [Object],
      last_edited_by: [Object],
      cover: null,
      icon: null,
      parent: [Object],
      archived: false,
      properties: [Object],
      url: '...'
    },
    ...
  ],
  next_cursor: null,
  has_more: false,
  type: 'page',
  page: {}
}
ローカルサーバーを起動してみます。
これで画像のように情報が表示されていたら成功です。
npm run dev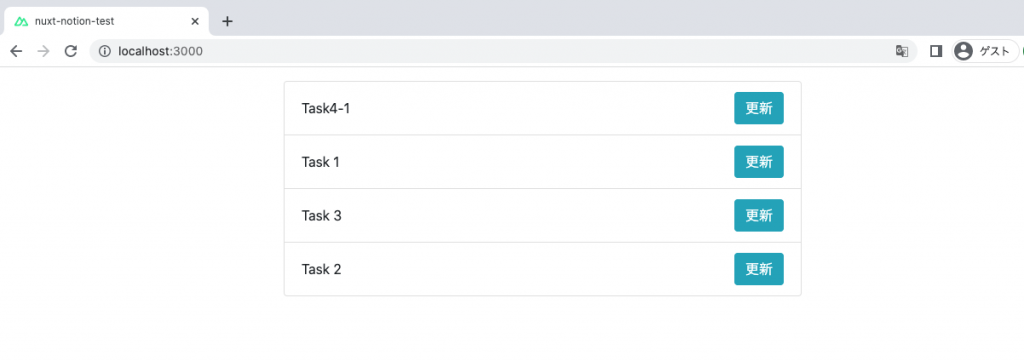
Notionからのデータ取得ではasyncData()を利用できたため、サーバー側でAPI通信を行うことができました。
ここでは
「更新ボタンをクリックしてタイトルを更新する処理」
を実装します。
しかしブラウザからAPI通信を行うとCORSエラーになり、上手く情報を更新できません。
そこでCORSを回避する為、Nuxt.jsで用意されている serverMiddleware を利用してサーバー側からAPI通信を行います。
まずpages/index.vue に更新ボタンをクリックした時の処理を追記します。
下記に pages/index.js の全コードを表示しますが、
追記したのは<script>配下の methods: { 以降のみです。
<template>
  <ul class="list-group w-50 m-auto p-3">
    <li v-for="item in results"
        :key="item.id"
        :id="item.id"
        class="list-group-item d-flex align-items-center justify-content-between">
      <p contenteditable class="mb-0">{{item.properties.Name.title[0].text.content}}</p>
      <button @click="updateItem" class="btn btn-info flex-shrink-0">更新</button>
    </li>
  </ul>
</template>

<script>
import { Client } from '@notionhq/client';
const notion = new Client({auth: process.env.NOTION_TOKEN});

export default {
  async asyncData() {
    const myPage = await notion.databases.query({
      database_id: process.env.DATABASE_ID,
    })
    return myPage
  },
  methods: {
    updateItem(e) {
      const li = e.target.parentNode;
      const pageId = li.id;
      const text = li.querySelector('p').innerText;
      this.$axios.get(`${location.origin}/server-middleware-update?pageId=${pageId}&text=${text}`);
    }
  }
}
</script>次にserverMiddleware を設定します。
nuxt_notion直下に serverMiddleware ディレクトリを作成して、その下に update.js を作成します。
import { Client } from '@notionhq/client';
import url from 'url';
const notion = new Client({auth: process.env.NOTION_TOKEN});

module.exports = (req, res) => {
  req.query = url.parse(req.url, true).query
  const pageId = req.query.pageId;
  const text = req.query.text;

  (async () => {
    const response = await notion.pages.update({
      page_id: pageId,
      properties: {
        Name: {
          title: [
            {
              text: {
                content: text
              }
            }
          ]
        },
      }
    });
  })();
};最後にserverMiddlewareを使えるようにnuxt.config.jsに追記します。
記述する行はどこでも構いません。
serverMiddleware: [
  { path: '/server-middleware-update', handler: '~/serverMiddleware/update' }
],
これで更新処理も完了しました。
http://localhost:3000/
にアクセスしリロードしてください。
その後、タイトルをクリックして編集、更新ボタンをクリックでNotionのデータベースが更新されていることを確認してみてください。

以上でデータ更新もできるようになりました!
続いてtodoの追加を実装します。
template側は下記のように変更します。
+ボタンなどを追加しています。
<template>
  <ul class="list-group w-50 m-auto p-3">
    <li v-for="item in results"
        :key="item.id"
        :id="item.id"
        class="list-group-item d-flex align-items-center justify-content-between">
      <p contenteditable class="mb-0 d-block w-100">{{item.properties.Name.title[0].text.content}}</p>
      <button @click="updateItem" class="btn btn-info flex-shrink-0 ml-auto mr-1">更新</button>
    </li>
    <li class="list-group-item d-flex align-items-center justify-content-between">
      <p contenteditable class="mb-0 d-block w-100"></p>
      <button @click="postItem" class="btn btn-primary">+</button>
    </li>
  </ul>
</template>
次に+ボタンをクリックしたときのpostItem関数を実装します。
入力した文字列を取得し、この後作るserverMiddlewareにデータを渡します。
<script>
import { Client } from '@notionhq/client';
const notion = new Client({auth: process.env.NOTION_TOKEN});

export default {
  async asyncData() {
    const myPage = await notion.databases.query({
      database_id: process.env.DATABASE_ID,
    })
    return myPage
  },
  methods: {
    postItem(e) {
      const li = e.target.parentNode;
      const text = li.querySelector('p').innerText;
      this.$axios.post(`${location.origin}/server-middleware-post?text=${text}`)
        .then(res=>{
          this.results = res.data.results;
          li.querySelector('p').innerText = '';
        });
    },
    updateItem(e) {
      const li = e.target.parentNode;
      const pageId = li.id;
      const text = li.querySelector('p').innerText;
      this.$axios.post(`${location.origin}/server-middleware-update?pageId=${pageId}&text=${text}`);
    }
  }
}
</script>
上記のpostItemで渡された文字列を受け取り、Notionに登録します。
さらにNotionに登録後、登録されたtodoを画面に表示するためresponseを返しています。
本来はVuexなど状態管理ライブラリを導入して即時更新されるように実装するべきかと思いますが、本記事の目的とずれるので実装しません。
import { Client } from '@notionhq/client';
import url from 'url';
const notion = new Client({auth: process.env.NOTION_TOKEN});

module.exports = (req, res) => {
  req.query = url.parse(req.url, true).query;
  const text = req.query.text;

  (async () => {
    const response = await notion.pages.create({
      parent: {
        database_id: process.env.DATABASE_ID,
      },
      properties: {
        Name: {
          title: [
            {
              text: {
                content: text,
              },
            },
          ],
        }
      }
    });
    let myPage = await notion.databases.query({
      database_id: process.env.DATABASE_ID,
    })
    res.end(JSON.stringify(myPage), 'utf8')
  })();

};
最後にnuxt.config.jsにmiddlewareの登録をします。
serverMiddleware: [
  { path: '/server-middleware-post', handler: '~/serverMiddleware/post' },
  { path: '/server-middleware-update', handler: '~/serverMiddleware/update' }
],
これでtodo追加の処理は完了です。
最後にデータの削除です。
ここではtodoの削除を実装します。
まずは表示側のコーディングをします。
更新ボタンの隣にxボタンを追加しています。
<template>
  <ul class="list-group w-50 m-auto p-3">
    <li v-for="item in results"
        :key="item.id"
        :id="item.id"
        class="list-group-item d-flex align-items-center justify-content-between">
      <p contenteditable class="mb-0 d-block w-100">{{item.properties.Name.title[0].text.content}}</p>
      <button @click="updateItem" class="btn btn-info flex-shrink-0 ml-auto mr-1">更新</button>
      <button @click="deleteItem" class="btn btn-link text-secondary">x</button>
    </li>
    <li class="list-group-item d-flex align-items-center justify-content-between">
      <p contenteditable class="mb-0 d-block w-100"></p>
      <button @click="postItem" class="btn btn-primary">+</button>
    </li>
  </ul>
</template>
次にxボタンをクリックしたときのdeleteItem関数を実装します。
<script>
import { Client } from '@notionhq/client';
const notion = new Client({auth: process.env.NOTION_TOKEN});

export default {
  async asyncData() {
    const myPage = await notion.databases.query({
      database_id: process.env.DATABASE_ID,
    })
    return myPage
  },
  methods: {
    postItem(e) {
      const li = e.target.parentNode;
      const text = li.querySelector('p').innerText;
      this.$axios.post(`${location.origin}/server-middleware-post?text=${text}`)
        .then(res=>{
          this.results = res.data.results;
          li.querySelector('p').innerText = '';
        });
    },
    updateItem(e) {
      const li = e.target.parentNode;
      const pageId = li.id;
      const text = li.querySelector('p').innerText;
      this.$axios.post(`${location.origin}/server-middleware-update?pageId=${pageId}&text=${text}`);
    },
    deleteItem(e) {
      const li = e.target.parentNode;
      const pageId = li.id;
      this.$axios.delete(`${location.origin}/server-middleware-delete?pageId=${pageId}`)
        .then(res => this.results = res.data.results);
    }
  }
}
</script>
上記で渡されたtodoを受け取りNotionから削除するmiddleware/delete.jsを作成します。
こちらでもNotionから削除後、削除されたtodoを画面から消すためにresponseを返しています。
import { Client } from '@notionhq/client';
import url from 'url';
const notion = new Client({auth: process.env.NOTION_TOKEN});

module.exports = (req, res) => {
  req.query = url.parse(req.url, true).query;
  const pageId = req.query.pageId;

  (async () => {
    const response = await notion.pages.update({
      page_id: pageId,
      archived: true
    });
    let myPage = await notion.databases.query({
      database_id: process.env.DATABASE_ID,
    })
    res.end(JSON.stringify(myPage), 'utf8')
  })();

};
最後にnuxt.config.jsにmiddlewareの登録をします。
serverMiddleware: [
  { path: '/server-middleware-post', handler: '~/serverMiddleware/post' },
  { path: '/server-middleware-update', handler: '~/serverMiddleware/update' },
  { path: '/server-middleware-delete', handler: '~/serverMiddleware/delete' }
],
これでtodo削除の処理は完了です。
割と簡単にCRUD機能を持ったアプリ開発ができました。
Notionは今後も発展していくWebサービスだと思うので、覚えておいて損はないかと思います!
またAPIを使わなくても、とても便利なサービスなので是非使ってみてください!
(といっても僕はあまり使いこなせていませんが...)
最後までお読みいただきありがとうございました!!


![]()
