2025年2月26日のNext.jsの15.2のアップデートで、React View Transitions (experimental)が追加されました。
上記を使うことで、ReactのフレームワークであるNext.jsでも簡単に「View Transitions API」が実装できるようになりました。
「View Transitions API」は、異なるページ間のアニメーション遷移やDOM(HTMLの構造)の変更に合わせたアニメーションを簡単に実装できる方法です。
上記が登場したことにより、ページ間のアニメーションなどがより自由に実装できるようになりました。
詳細は下記のリンクを見ると、参考動画などが載っていて、分かりやすいです。
https://developer.chrome.com/docs/web-platform/view-transitions?hl=ja
これまでNext.jsで「View Transitions API」を使おうとすると、「document.startViewTransition()」を呼び出したり、「addEventListener」を使ってDOMの操作やアニメーションの設定などを細かく設定する必要がありました。
しかし、今回の機能追加により、より簡単に、少ない手順で「View Transitions API」を扱えるようになっています。
この記事ではそんな「View Transitions API」をNext.jsでも簡単に使う方法について紹介します。
※experimentalの機能なので、今後仕様などが変更される可能性があります。
まずはNext.jsの環境構築を行い、<ViewTransiton>タグを使う方法を紹介します。
まずはNext.jsを導入していない場合は、Next.jsの環境を用意します。
また、Next.jsの環境はあるが、バージョンが低い場合は、Next.js15.2以上にアップデートしましょう。
# 最新版のNext.jsの環境作成
npx create-next-app@latest
# すでに環境がある場合
npx @next/codemod@canary upgrade latest
# または
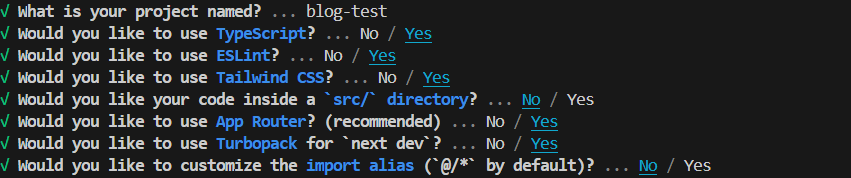
npm install next@latest react@latest react-dom@latestnpx create-next-app@latest のコマンドの場合だと下記の設定が1項目ずつ順番に表示されます。
Tailwind CSSとApp Routerというルーティング方法を利用するため、どちらもYesになっているか確認し、それ以外の項目は、デフォルトの設定や好きな設定で問題ありません。
CSSに関しては、「Tailwind CSS」を用いてスタイルを整えるため、もし無い場合は、追加でインストールと設定を行う必要があります。
shadcn/uiというコンポーネントライブラリを利用するので、このタイミングでインストールします。
npx shadcn@latest initそして、shadcn/uiから今回利用するコンポーネント(カードとボタン)をインストールします。
npx shadcn@latest add card button「React View Transitions」は現在experimental(実験的)な機能のため、デフォルトでは無効になっています。
そのため、利用するには手動で設定を有効にする必要があります。
また、Next.jsのImageコンポーネントで上記の画像を利用するために、placehold.jpのドメインを許可するように設定します。この記述が無いとエラーが表示されるので設定しましょう。
import type { NextConfig } from "next";

const nextConfig: NextConfig = {
  images: {
    remotePatterns: [
      {
        protocol: "https",
        hostname: "placehold.jp",
      },
    ],
  },
  experimental: {
    viewTransition: true,
  },
};

export default nextConfig;今回の例では、記事一覧ページからAboutページでの遷移のアニメーションを設定します。
遷移アニメーションを設定したい要素に、<ViewTransition>タグを囲むだけでOKです。
最初に記事一覧ページで表示するサンプルの記事データを用意します。
記事データ
app/utils/constants.ts
export const POSTS = [
  {
    id: 1,
    title: "サンプル記事のタイトル1",
    image: "https://placehold.jp/1024x576.png",
    content:
      "これはサンプル記事1です。これはサンプル記事1です。これはサンプル記事1です。",
    date: "2024/03/01",
  },
  {
    id: 2,
    title: "サンプル記事のタイトル2",
    image: "https://placehold.jp/1024x576.png",
    content:
      "これはサンプル記事2です。これはサンプル記事2です。これはサンプル記事2です。",
    date: "2024/03/02",
  },
  {
    id: 3,
    title: "サンプル記事のタイトル3",
    image: "https://placehold.jp/1024x576.png",
    content:
      "これはサンプル記事3です。これはサンプル記事3です。これはサンプル記事3です。",
    date: "2024/03/03",
  },
];
次に記事一覧ページを実装します。
注意点としては、<ViewTransition>タグをimportをする際には、実験的な機能として提供されているため、下記のような形式でimportする必要があります。
import { unstable_ViewTransition as ViewTransition } from "react";記事一覧ページ
app/posts/page.tsx
import Image from "next/image";
import Link from "next/link";
import { unstable_ViewTransition as ViewTransition } from "react";
import { Button } from "@/components/ui/button";
import {
  Card,
  CardContent,
  CardDescription,
  CardHeader,
  CardTitle,
} from "@/components/ui/card";
import { POSTS } from "../utils/constants";

export default function Posts() {
  return (
    <ViewTransition>
      <main className="mx-auto py-8 max-w-7xl xl:px-0 px-6">
        <div className="flex justify-between items-center mb-8">
          <h1 className="text-3xl font-bold">記事一覧</h1>
          <Button variant="outline" className="hover:bg-gray-50">
            <Link href="/about">About</Link>
          </Button>
        </div>
        <div className="grid grid-cols-1 md:grid-cols-2 lg:grid-cols-3 gap-6">
          {POSTS.map((post) => (
            <Card key={post.id} className="pt-0">
              <div className="relative w-full aspect-[16/9]">
                <Image
                  src={post.image}
                  alt={`${post.title} image`}
                  fill
                  sizes="100vw"
                  className="object-cover rounded-t-[10]"
                />
              </div>
              <CardHeader>
                <CardTitle className="mb-2">{post.title}</CardTitle>
                <CardDescription className="mb-2 text-sm text-gray-500">
                  {post.date}
                </CardDescription>
              </CardHeader>
              <CardContent>
                <p className="text-sm">{post.content}</p>
              </CardContent>
            </Card>
          ))}
        </div>
      </main>
    </ViewTransition>
  );
}
Aboutページ
app/about/page.tsx
import Link from "next/link";
import { unstable_ViewTransition as ViewTransition } from "react";
import { Button } from "@/components/ui/button";

export default function About() {
  return (
    <ViewTransition>
      <main className="mx-auto py-8 max-w-7xl xl:px-0 px-6">
        <div className="flex justify-between mb-8">
          <div>
            <h1 className="text-3xl font-bold">About</h1>
            <p className="my-4">
              AboutページですAboutページですAboutページです Aboutページです
              Aboutページです
            </p>
          </div>
          <Button variant="outline" className="hover:bg-gray-50">
            <Link href="/posts">記事一覧</Link>
          </Button>
        </div>
      </main>
    </ViewTransition>
  );
}
上記のコードを実装したら、エディタ上のターミナルで次のコマンドを入力し、開発サーバーを起動しましょう。
npm run devそしてローカル環境から画面で確認するとふわっと消えるような画面遷移アニメーションがかかり、設定することができました。
次はデフォルトのアニメーションではなく、独自のCSSのアニメーションを適用する方法を紹介します。
先ほどのコードの<ViewTransiton>タグにname属性として「"test-transition"」を追加します。
記事一覧ページ
app/posts/page.tsx
{/* 省略 */}
 <ViewTransition name="test-transition">
{/* 省略 */}
Aboutページ
app/about/page.tsx
{/* 省略 */}
 <ViewTransition name="test-transition">
{/* 省略 */}
そして設定したい遷移アニメーションのcssを追加します。
app/globals.css
@keyframes slide-out {
  0% {
    transform: translateX(0);
  }
  100% {
    opacity: 0;
    transform: translateX(-3rem);
  }
}

@keyframes slide-in {
  0% {
    opacity: 0;
    transform: translateX(3rem);
  }
  100% {
    opacity: 1;
    transform: translateX(0);
  }
}

::view-transition-old(test-transition) {
  animation: slide-out 0.5s ease-out both;
}

::view-transition-new(test-transition) {
  animation: slide-in 0.5s ease-out both;
  animation-delay: 300ms;
}
::view-transition-new() は、遷移後の「新しい状態」に対するアニメーションを設定できます。https://developer.mozilla.org/ja/docs/Web/CSS/::view-transition-new
一方、::view-transition-old() は遷移前の「古い状態」のビューに対するアニメーションを指定するための疑似要素です。
https://developer.mozilla.org/ja/docs/Web/CSS/::view-transition-old
この()の中にクラス名を記入します。今回だと"test-transition"を記載しています。
注意点としては、同じ画面内でname属性の名前の重複を避けるようにしましょう。
なので、「test-transition」のクラス名は1画面で1つのみ記載するようにしましょう。
上記の例だと右から左に移動しながら現れるアニメーション(slide-in)を新しいページ(遷移後)に適用し、古いページ(遷移前)には左へ移動しながら消えるアニメーション(slide-out)を適用しています。
注意点としては、「View Transitions API」は、2025年6月現在ではFirefoxではまだ未対応なので、注意が必要です。
下記の例では、記事を削除した場合のアニメーションを実装してみます。
記事を削除する関数と記事カードに削除ボタンを先ほどのコードに追加します。
記事一覧ページ
app/posts/page.tsx
"use client";
import Image from "next/image";
import Link from "next/link";
import { Trash2 } from "lucide-react";
import {
  startTransition,
  useState,
  unstable_ViewTransition as ViewTransition,
} from "react";
import { Button } from "@/components/ui/button";
import {
  Card,
  CardContent,
  CardDescription,
  CardHeader,
  CardTitle,
} from "@/components/ui/card";
import { POSTS } from "../utils/constants";

export default function Posts() {
  const [posts, setPosts] = useState(POSTS);

  /**
   * postを削除する
   */
  function deletePost(id: number) {
    startTransition(() => {
      const newPosts = posts.filter((post) => post.id !== id);
      setPosts(newPosts);
    });
  }
  return (
    <ViewTransition>
      <main className="mx-auto py-8 max-w-7xl xl:px-0 px-6">
        <div className="flex justify-between items-center mb-8">
          <h1 className="text-3xl font-bold">記事一覧</h1>
          <Button variant="outline" className="hover:bg-gray-50">
            <Link href="/about">About</Link>
          </Button>
        </div>
        <div className="grid grid-cols-1 md:grid-cols-2 lg:grid-cols-3 gap-6">
          {posts.map((post) => (
            <Card key={post.id} className="pt-0">
              <div className="relative w-full aspect-[16/9]">
                <Image
                  src={post.image}
                  alt={`${post.title} image`}
                  fill
                  sizes="100vw"
                  className="object-cover rounded-t-[10]"
                />
              </div>
              <CardHeader>
                <CardTitle className="mb-2">{post.title}</CardTitle>
                <CardDescription className="mb-2 text-sm text-gray-500">
                  {post.date}
                </CardDescription>
              </CardHeader>
              <CardContent>
                <p className="text-sm">{post.content}</p>
                <div className="flex justify-end">
                  <Button
                    variant="ghost"
                    className="hover:opacity-70"
                    onClick={() => deletePost(post.id)}
                  >
                    <Trash2 className="h-4 w-4" />
                  </Button>
                </div>
              </CardContent>
            </Card>
          ))}
        </div>
      </main>
    </ViewTransition>
  );
}試してみると、記事の削除時にふわっとしたアニメーションが追加されます。
この記事の削除処理には、Reactの関数の「startTransition」を囲んで利用しています。
この「startTransition」は、UIをブロックせずに状態を非同期的に更新できるReactの機能です。
つまり、低優先度(トランジション)で良いということをReact側に伝えているため、UI側にあまり影響を出さずに更新することが可能です。
仮に「startTransition」を外して、削除処理を実装すると、React側はすぐにUIに反映しようとするため、「View Transitions API」の処理が間に合わず、アニメーションが発生しなくなると考えられます。
そのため、削除処理などの際には「startTransition」で状態更新を囲むことで、アニメーションを反映しながら、非同期的に処理が可能です。
https://ja.react.dev/reference/react/startTransition#marking-a-state-update-as-a-non-blocking-transition
記事一覧ページから記事詳細ページに遷移する際にアニメーションを設定します。
ちなみに<ViewTransition>タグは、アニメーションのタイミングをpropsで設定できます。
細かくアニメーションが表示されるタイミング調整をしたい場合には、上記のpropsもぜひ利用してみてください。
https://react.dev/reference/react/ViewTransition#props
記事一覧ページ
app/posts/page.tsx
import Image from "next/image";
import Link from "next/link";
import { unstable_ViewTransition as ViewTransition } from "react";
import {
  Card,
  CardContent,
  CardDescription,
  CardHeader,
  CardTitle,
} from "@/components/ui/card";
import { Button } from "@/components/ui/button";
import { POSTS } from "../utils/constants";

export default function Posts() {
  return (
    <main className="mx-auto py-8 max-w-7xl xl:px-0 px-6">
      <div className="flex justify-between items-center mb-8">
        <h1 className="text-3xl font-bold">記事一覧</h1>
        <Button variant="outline" className="hover:bg-gray-50">
          <Link href="/about">About</Link>
        </Button>
      </div>
      <div className="grid grid-cols-1 md:grid-cols-2 lg:grid-cols-3 gap-6">
        {POSTS.map((post) => (
          <Link href={"posts/" + post.id} key={post.id}>
            <Card className="duration-300 hover:shadow-lg hover:-translate-y-1 hover:bg-gray-50 pt-0">
              <ViewTransition name={`image-${post.id}`}>
                <div className="relative w-full aspect-[16/9]">
                  <Image
                    src={post.image}
                    alt={`${post.title} image`}
                    fill
                    sizes="100vw"
                    className="object-cover rounded-t-[10]"
                  />
                </div>
              </ViewTransition>
              <CardHeader>
                <ViewTransition name={`title-${post.id}`}>
                  <CardTitle className="mb-2">{post.title}</CardTitle>
                </ViewTransition>
                <ViewTransition name={`date-${post.id}`}>
                  <CardDescription className="text-sm text-gray-500 mb-2">
                    {post.date}
                  </CardDescription>
                </ViewTransition>
              </CardHeader>
              <CardContent>
                <ViewTransition name={`content-${post.id}`}>
                  <p className="text-sm">{post.content}</p>
                </ViewTransition>
              </CardContent>
            </Card>
          </Link>
        ))}
      </div>
    </main>
  );
}
そして、簡易的な記事詳細ページを実装します。
記事詳細ページ
app/posts/[id]/page.tsx
import Image from "next/image";
import Link from "next/link";
import { unstable_ViewTransition as ViewTransition } from "react";
import { Button } from "@/components/ui/button";
import { POSTS } from "../../utils/constants";

export default async function PostDetail({
  params,
}: {
  params: { id: string };
}) {
  const { id } = await params;

  // 投稿の絞り込み
  const post = POSTS.find((post) => post.id === parseInt(id));

  //記事がない場合エラー
  if (!post) {
    throw new Error(`Post with id ${id} not found`);
  }

  return (
    <main className="mx-auto py-8 max-w-7xl xl:px-0 px-6">
      <Button variant="outline" className="text-blue-600 hover:underline mt-1">
        <Link href="/posts">戻る</Link>
      </Button>
      <article className="w-full flex-1 pt-6">
        <div className="flex justify-center mb-6">
          <ViewTransition name={`image-${post.id}`}>
            <Image
              src={post.image}
              alt={`${post.title} image`}
              width={1024}
              height={576}
            />
          </ViewTransition>
        </div>
        <h1 className="text-4xl font-bold mb-2">
          <ViewTransition name={`title-${post.id}`}>
            <span>{post.title}</span>
          </ViewTransition>
        </h1>
        <ViewTransition name={`date-${post.id}`}>
          <p className="text-gray-500 mb-4">{post.date}</p>
        </ViewTransition>
        <ViewTransition name={`content-${post.id}`}>
          <section className="text-base leading-7 text-gray-700">
            <p>{post.content}</p>
          </section>
        </ViewTransition>
      </article>
    </main>
  );
}こうすることで、記事一覧ページの画像やタイトルなどの要素が、そのまま記事詳細ページにスムーズに移動するようなアニメーションを実現できます。
ポイントとしては、一覧ページと詳細ページで<ViewTransition>タグのname属性を同じ値にすることです。
同じnameを持つ要素は同じ要素として扱われるため、自動的に画面遷移のアニメーションが適用され、繋がっているようなアニメーションを表示できます。
<ViewTransition>タグで囲むことで、Next.jsで簡単に画面遷移アニメーションを作れるようになったのはとてもありがたいです。
こういったアニメーションがあると、ユーザーをより惹きつけることができるので、ぜひ利用してみてください。

![]()


