※本記事は、NorthDetail Advent Calendar 2019の一環として投稿しています
Vue.jsとFirebaseを利用してPWAでPush通知がくるメモアプリを作成してみました。
ざっくり実装したことなどをご紹介しますm(_ _)m
学生時代に手書きレポートの下書きをPCで打ち込んでいたのですが、実際にマス目に当てはめると段落の切り替えや、数字を1マスに2つ入れる...etcなどのルールがあったりして、文字数=マス目の数にならないので、PCで下書きをして文字数を原稿用紙にあわせても、結局文章の長さが多すぎたり、逆に足りなかったりすることが多々ありました。
ということで、打ち込んだ文章を原稿用紙に当てはめたようにして表示するアプリを作成してみました。
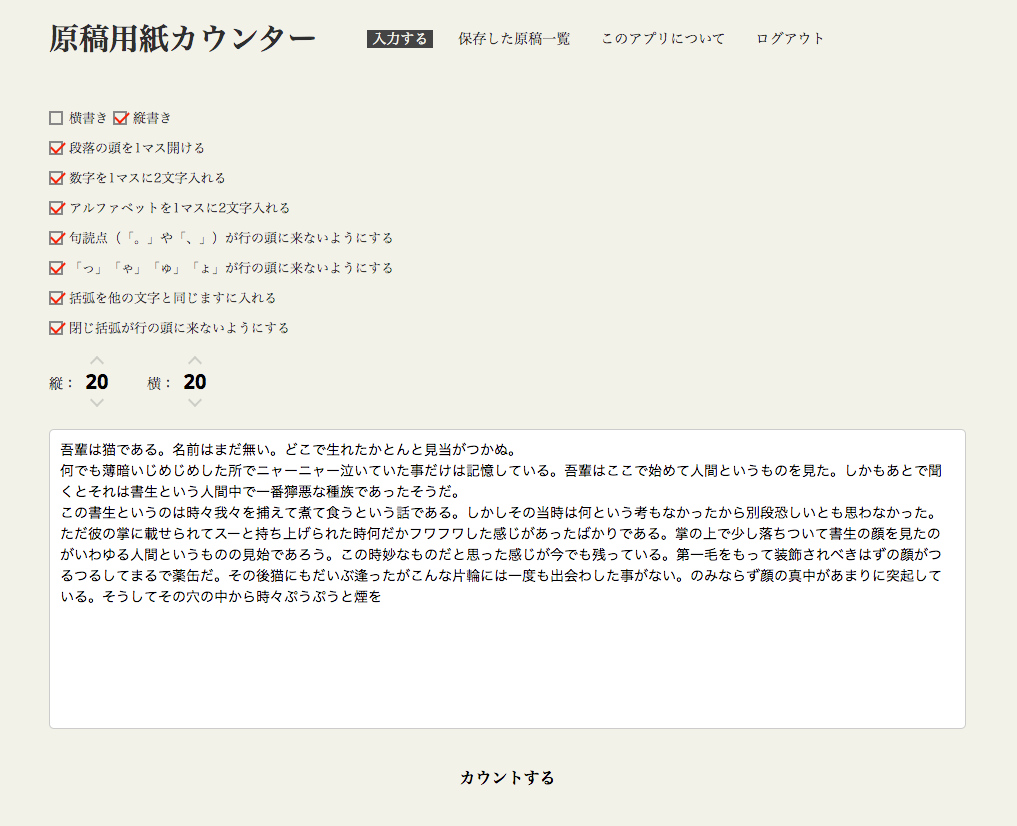
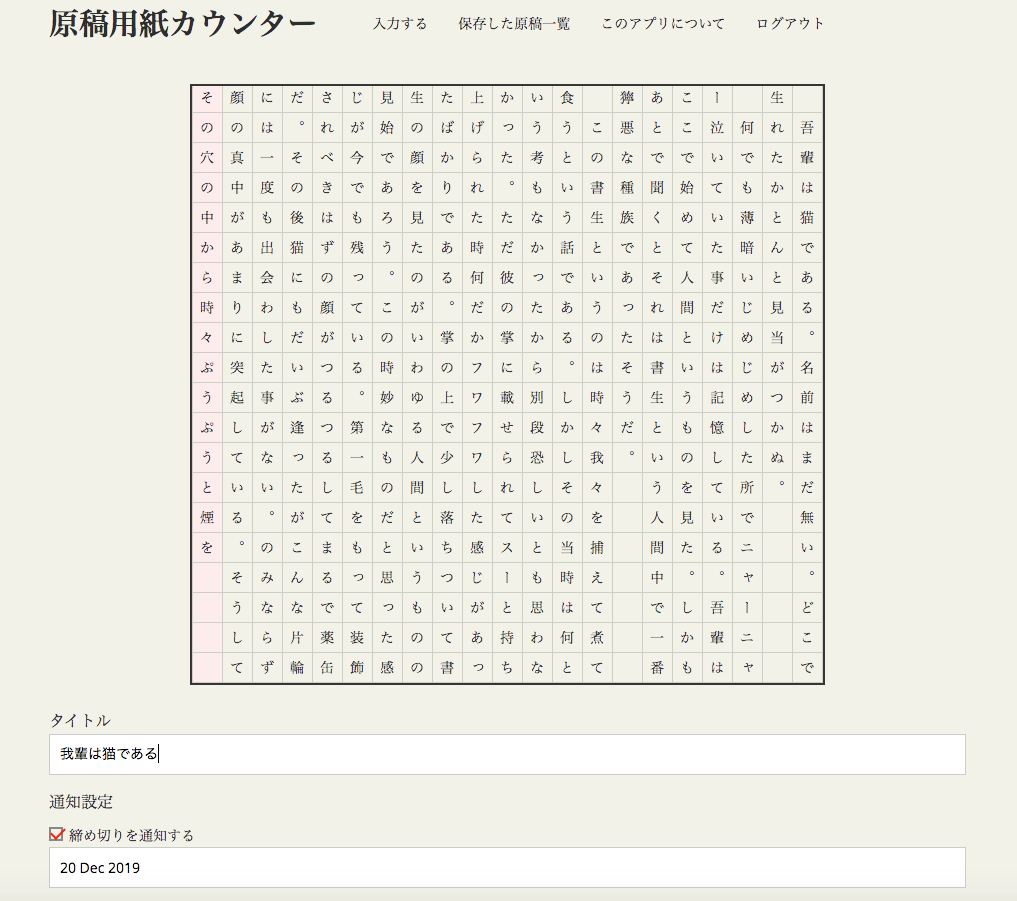
文字数オーバーした箇所は赤いマスで表示されます。
「段落の頭を1マス開ける」、「括弧を他の文字と同じますに入れる」など、実際の原稿用紙のルールに則った書式設定ができるので、打った文章が原稿用紙何枚分に収まるのかを確認することができます。
入力した文章と、原稿用紙の書式設定をFireStoreにて管理。
大まかにですが、実装の手順について紹介しようと思います。
yarnがインストールされている前提です。
// vueCLIをインストール
yarn global add @vue/cli

// 新規プロジェクト作成
vue create <プロジェクト名>
上記コマンドでプロジェクトを作成。
デフォルトのプリセットを使うか、手動で選択するかを聞かれるので Manually select features を選択。
? Please pick a preset:
  default (babel, eslint)
❯ Manually select features
続く設問も下記のように選択。
? Check the features needed for your project:
❯ ◉ Babel
  ◯ TypeScript
❯ ◉ Progressive Web App (PWA) Support
❯ ◉ Router
❯ ◉ Vuex
❯ ◉ CSS Pre-processors
❯ ◉ Linter / Formatter
  ◯ Unit Testing
  ◯ E2E Testing

? Use history mode for router? (Requires proper server setup for index fallback in production)
❯ Yes

? Pick a CSS pre-processor (PostCSS, Autoprefixer and CSS Modules are supported by default)
❯ Scss

? Pick a linter / formatter config
❯ ESLint with error prevention only

? Pick additional lint features: (Press <space> to select, <a> to toggle all, <i> to invert selection)
❯ Lint on save

? Where do you prefer placing config for Babel, PostCSS, ESLint, etc.?
❯ In dedicated config files
これでVueプロジェクトの雛形が生成されるので、下記コマンドを実行するとアプリを立ち上げることができます。
// プロジェクトフォルダに移動
cd <プロジェクト名>

// ローカルで実行
yarn run serve//Firebaseインストール
$ yarn global add firebase-tools
// Googleアカウントでログイン
$ firebase login
// Firebaseの設定
$ firebase init
? Which Firebase CLI features do you want to setup for this folder? Press Space to select features, then Enter to confirm your choices.
◯ Database: Deploy Firebase Realtime Database Rules
◉ Firestore: Deploy rules and create indexes for Firestore
◉ Functions: Configure and deploy Cloud Functions
◉ Hosting: Configure and deploy Firebase Hosting sites
◯ Storage: Deploy Cloud Storage security rules
? Select a default Firebase project for this directory: (Use arrow keys)
❯ document-paper-counter-81e10 (document-paper-counter) // コンソールで作成したプロジェクト選択
FireStoreの設定はデフォルトのまま
=== Firestore Setup

Firestore Security Rules allow you to define how and when to allow
requests. You can keep these rules in your project directory
and publish them with firebase deploy.

? What file should be used for Firestore Rules? firestore.rules


Firestore indexes allow you to perform complex queries while
maintaining performance that scales with the size of the result
set. You can keep index definitions in your project directory
and publish them with firebase deploy.

? What file should be used for Firestore indexes? firestore.indexes.json


=== Functions Setup

A functions directory will be created in your project with a Node.js
package pre-configured. Functions can be deployed with firebase deploy.

? What language would you like to use to write Cloud Functions? JavaScript
? Do you want to use ESLint to catch probable bugs and enforce style? No
✔  Wrote functions/package.json
✔  Wrote functions/index.js
✔  Wrote functions/.gitignore
? Do you want to install dependencies with npm now? Yes
Hostingの設定は下記のように設定
=== Hosting Setup

Your public directory is the folder (relative to your project directory) that
will contain Hosting assets to be uploaded with firebase deploy. If you
have a build process for your assets, use your build's output directory.

? What do you want to use as your public directory? dist
? Configure as a single-page app (rewrite all urls to /index.html)? Yesfirebase.initializeAppを実行import firebase from 'firebase/app'
// initialize Firebase
let config = {
apiKey: process.env.VUE_APP_FIRE_BASE_apiKey,
authDomain: process.env.VUE_APP_FIRE_BASE_authDomain,
databaseURL: process.env.VUE_APP_FIRE_BASE_databaseURL,
projectId: process.env.VUE_APP_FIRE_BASE_projectId,
storageBucket: process.env.VUE_APP_FIRE_BASE_storageBucket,
messagingSenderId: process.env.VUE_APP_FIRE_BASE_messagingSenderId,
appId: process.env.VUE_APP_FIRE_BASE_appId
}
firebase.initializeApp(config)
...略これで、Firebaseの初期設定ができました。
これらの手順で生成されたものを元に、大まかに下記のようなフォルダ構成で作成しました。
├── dist
│   └── ビルド後に生成されるファイル
│
├── firebase.json
├── firestore.indexes.json
├── firestore.rules
├── functions
│   ├── index.js
│   ├── package-lock.json
│   └── package.json
│
├── public
│   ├── 404.html
│   ├── favicon.ico
│   ├── firebase-messaging-sw.js
│   ├── img
│   │   └── icons
│   ├── index.html
│   ├── manifest.json
│   └── robots.txt
├── src
│   ├── App.vue
│   ├── main.js
│   ├── registerServiceWorker.js
│   ├── api
│   │   └── firebase.js
│   ├── assets
│   │   └── scss
│   │       └── entry.scss
│   ├── components
│   │   ├── dialog.vue
│   │   └── head-menu.vue
│   ├── pages
│   │   ├── help.vue
│   │   ├── input.vue
│   │   ├── list.vue
│   │   └── result.vue
│   ├── router
│   │   └── index.js
│   └── store
│       ├── index.js
│       └── modules
│           ├── auth.js
│           ├── counter.js
│           └── list.js
└── vue.config.js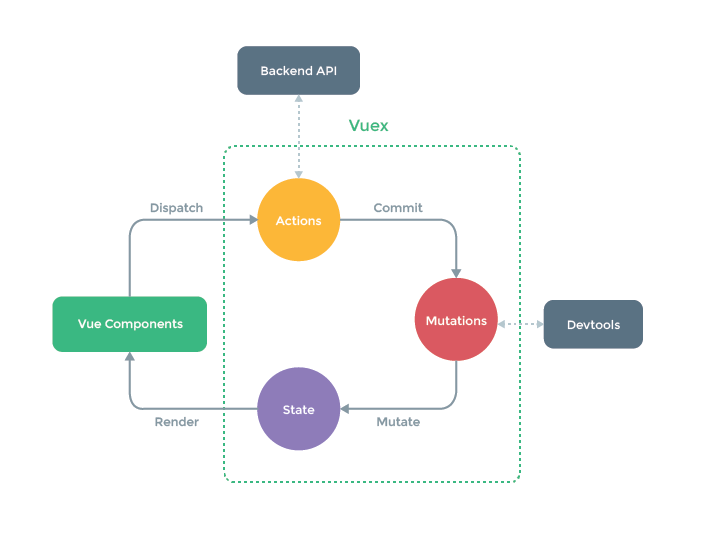
引用元: https://vuex.vuejs.org/ja/
上記の図の、VueComponentsに当たる部分がsrc/componentsとsrc/pagesになります。vuexに当たる部分がstore内に格納されているものです。
今回の場合、BackendAPIに当たる部分がFirebaseになるため、Firebaseに関する関数をsrc/api/firebase.jsに集約し、storeフォルダ内のコードから呼び出す方針で実装しました。
今回ここについては省略します。
今回はGoogleアカウントで認証できるように実装しました。
...略

const auth = firebase.auth()

export default {
  initFirebase () {
    auth.onAuthStateChanged(this.onAuthStateChanged.bind(this))
  },

  login () {
    var provider = new firebase.auth.GoogleAuthProvider()
    auth.signInWithPopup(provider)
  },

  logout () {
    auth.signOut()
  },

  onAuthStateChanged (user) {
    if (user) {
     // ユーザがログインしている時の処理
    } else {
     // 未ログイン時の処理
    }
  },

...略
main.js に以下を追加
import Firebase from './api/firebase'

Firebase.initFirebase()
この処理だけでGoogleアカウントでの認証が完了しました。
以前使われていたFirebaseRealtimeDatabaseではデータベース構造をjsonファイルで記述する必要がありましたが、FireStoreでは書き込みのルールのみ指定すれば、自由にカラムを作成できるようです。
...略
import 'firebase/firestore'
export default {
  //例) 原稿のデータをfirestoreに保存する関数
  saveDocument (document) {
    return new Promise((resolve, reject) => {
      const userId = VueCookies.get('userInfo').uid // cookieに保存しておいたユーザIDを取得
      database.collection('users').doc(userId).collection('documents')
        .add(document)
        .then((ref) =>  {
          resolve(ref)
        }).catch(reject)
    })
  },
}※Push通知に関してはSafariやiOS端末などでは非対応です。iPhoneでは通知を出せません。
PWA化とCloudMessagingの導入に関しては、下記記事を参考に実装しました。
Vue CLI 3 で PWA チュートリアル(Service Workers / Add to Home Screen / Push Notifications)
注意点として、
... 略
let messaging

if(firebase.messaging.isSupported()) {
  messaging = firebase.messaging()
}

export default {
  initFirebase () {
    auth.onAuthStateChanged(this.onAuthStateChanged.bind(this))

    if (firebase.messaging.isSupported()) {
      messaging.usePublicVapidKey(process.env.VUE_APP_FIRE_BASE_publicVapidKey)
      store.dispatch('auth/checkMessagingisSupported', true)
    } else {
      store.dispatch('auth/checkMessagingisSupported', false)
    }
  },
...略上記のようにfirebase.messaging.isSupported()関数でCloudMessagingに対応した環境かどうかを判定しないと
iOS端末など、CloudMessageingが非対応の環境ではページがまっしろになってしまいます。
複数の端末でログインしても、全ての端末にpush通知が届くように、複数端末トークンを利用しました。
参考ページ
ウェブ / JavaScriptでデバイス グループにメッセージを送信する|Firebase
トークン追加のURLをそのまま叩くと、クロスドメイン制約に引っかかってしまうため、下記のエラーが出てしまいます。
Access-Control-Allow-Origin そこで、プロキシの設定をします。vue.config.jsに下記の設定を追加。
module.exports = {
    ...略
    devServer: {
        proxy: 'https://fcm.googleapis.com/',
    }
}これで、<アプリが立ち上がっているサーバのドメイン>/hoge/some
にリクエストを飛ばすと、devserverを経由してhttps://fcm.googleapis.com/hoge/some
にリクエストが送信されるようになります。
実際には、開発環境と本番環境でドメインが違うので、環境変数にドメインを格納します。
.envファイルに本番環境のドメインを変数で追加
VUE_APP_API_URL_BASE="<デプロイする先のドメイン>".env.developファイルに、開発環境(localhost)のドメインを追加
VUE_APP_API_URL_BASE="http://localhost:8080"これで、ドメイン部分を変数で指定すると、開発環境でも、本番環境でも、クロスドメイン制約に引っかかることなくリクエストを叩けるようになりました。
...略
  // 通知用トークンの取得
  getNotinotificationKey () {
    const userId = VueCookies.get('userInfo').uid
    const url = process.env.VUE_APP_API_URL_BASE + "/fcm/notification?notification_key_name=" + userId
    let headers = {
      'Content-Type':'application/json',
      'Authorization': 'key=' + process.env.VUE_APP_FIRE_BASE_serverKey,
      'project_id': process.env.VUE_APP_FIRE_BASE_messagingSenderId
    }
    return new Promise((resolve, reject) => {
      axios.get(url, {headers: headers, data: {}})
        .then(res => {
          resolve(res.data)
        }).catch(err => {
          reject(err)
        })
    })
  },
...略// firestoreにから通知対象のデータと、トークンを取得
async function getNotificationDocument () {
try {
// notificationListに通知するデータを格納済み
const querySnapshot = await database.collection('notificationList').get()
return querySnapshot.docs.filter(doc => {
return moment().isSame(doc.data().deadline, 'day')
}).map(doc => {
return {
notificationKey: doc.data().notificationKey,
title: doc.data().title,
id: doc.id
}
})
} catch (error) {
throw error
}
}
// push通知を送信する
async function DeadlineDocument(documents) {
const url = "https://fcm.googleapis.com/fcm/send"
const headers = {
'Authorization': 'key=' + functions.config().vue_app.server_key,
}
try{
for(let document of documents) {
let data = {
"notification": {
"title": "「" + document.title + "」は今日締め切りです", //通知のタイトル
"click_action": "result/" + document.id //通知を押した時の飛び先
},
"to": document.notificationKey //トークン
}
axios.post(url, data, {headers: headers, useCredentails: true})
await sleep(2000)
}
return documents
} catch (error) {
throw error.response.status
}
}
// デプロイする関数
exports.pushNotification = functions.https.onRequest(async (request, response) => {
try{
const res = await getNotificationDocument()
const today = await pushNotificationTodaysDeadlineDocument(res.today)
response.send(today)
} catch (error) {
response.status(500).send(error)
}
})下記コマンドでfunctionをデプロイ
$ firebase deploy --only functions

Function URL (addMessage): https://MY_PROJECT.cloudfunctions.net/pushNotification
FunctionURLをブラウザで開いて、push通知が送信されれば成功です◎
Firebaseのみで定期実行をすることができますが、課金が必要です。
今回は、無料で実装したかったため、外部のCronを利用しました。
これで設定がうまくいっていれば、設定したスケジュールで通知されます🎉
CloudMessagingは初めて利用しましたが、想像以上に簡単にpush通知を実装することができました。
PWA化もVueCLIを利用すれば、手間無く実装できました。
PWAはiOSの対応状況が芳しくないので、今後に期待です。。。😔
原稿用紙の表示部分は思いつきとチカラワザで実装したので、バグがあるかもしれないです。。
不具合など見つけたらご指摘いただけると助かりますm(_ _)m

![]()