![]()
![]()
こんにちは、tacckです。
先日の eiyuu の記事にあるように、社内の座席管理システム "せきとりくん" を一緒に作っています。
せきとりくんでは、フロントエンドは Vue.js を、バックエンドは AWS Amplify を選択しています。
AWS Amplify は以前から気になっていて、今回実際に触ってみてとても良いソリューションだと感じたので、私の理解できた範囲の中から少しずつでも紹介していけたらと思っています。
今回は Hosting 機能を紹介したいと思います。
これは、 AWS Amplify が良い感じに静的サイトを公開してくれるもの になります。
React や Vue.js などを使った SPA 系のサイト (いわゆるJAMStackのフロントエンド部分) では重厚な Webサーバ は不要で、 HTML/CSS/JS といった静的ファイルを高速に配信できるWebサーバの方が必要になってきます。
これを Amplify が簡単に提供してくれるのです。すごい。
ちょうどせきとりくんのマニュアルを VuePress で作成しているので、これを使う流れで Amplify での Hosting の使い方をみていきます。
まずは、 VuePress のプロジェクトを作成します。これは Getting Started にある通りにやります。
$ mkdir sample-vuepress
$ cd sample-vuepress
$ yarn init -y
$ yarn add -D vuepress
$ mkdir docs
$ echo '# Hello VuePress' > docs/README.md
ドキュメントにあるように、 package.json に "scripts" の項目を追記します。
{
  "name": "sample-vuepress",
  "version": "1.0.0",
  "main": "index.js",
  "license": "MIT",
  "devDependencies": {
    "vuepress": "^1.5.0"
  },
  "scripts": {
    "docs:dev": "vuepress dev docs",
    "docs:build": "vuepress build docs"
  }
}
できたら、下記のように実行します。
$ yarn docs:dev
(snip)
success [15:23:47] Build d697d5 finished in 7263 ms!
> VuePress dev server listening at http://localhost:8080/
ブラウザで http://localhost:8080/ を開くと、下記のように表示されているはずです。
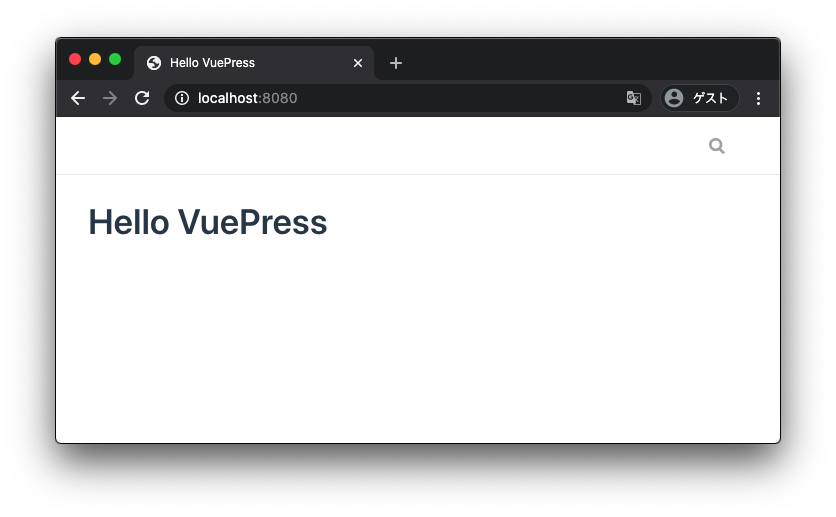
VuePress は Markdown 形式でドキュメントをさくっと書いて、さくっとページを作れるのでとても良いですね。
作成したファイル群を、 GitHub へ push します。
( GitHub 、 GitLab 、 Bitbucket 、 CodeCommit だと、Amplify で連携して自動デプロイを行なえるようになります。)
Git管理するために、下記の .gitignore を参考に自分のプロジェクトへファイルを追加します。
https://github.com/vuejs/vuepress/blob/master/.gitignore
# node modules
node_modules

# MacOS desktop services store
.DS_Store

# Log files
*.log

# Meta files
TODOs.md

# Editors
.vscode
.idea

# VuePress temp directory
.temp

# Docs dist directory
docs/.vuepress/dist

# Typescript build dist
packages/@vuepress/shared-utils/lib/
packages/@vuepress/shared-utils/types/
では、 GitHub へ push しましょう。
事前に GitHub でリポジトリを作成しておいてください。 (今回は tacck/sample-vuepress-amplify というリポジトリを使用)
$ git init
$ git add .
$ git commit -m "first commit"
[master (root-commit) f84349f] first commit
 4 files changed, 7842 insertions(+)
 create mode 100644 .gitignore
 create mode 100644 docs/README.md
 create mode 100644 package.json
 create mode 100644 yarn.lock
$ git remote add origin https://github.com/tacck/sample-vuepress-amplify.git
$ git push -u origin master続いて、 Amplify の設定を行ないます。まずは、 Amplify CLI のインストールです。
$ npm install -g @aws-amplify/cliこの後に amplify configure でAWSのアカウントとCLIの連携を行ないます。
が、すでに AWS CLI での設定が済んでいれば特にやらなくても使えます。
AWSアカウントとの連携が済んだら、下記のようにして Amplify のプロジェクトとして設定していきます。
$ amplify init
Note: It is recommended to run this command from the root of your app directory
? Enter a name for the project sample-vuepress
? Enter a name for the environment master
? Choose your default editor: Visual Studio Code
? Choose the type of app that you're building javascript
Please tell us about your project
? What javascript framework are you using none
? Source Directory Path:  docs
? Distribution Directory Path: docs/.vuepress/dist
? Build Command:  yarn docs:build
? Start Command: yarn docs:dev
Using default provider  awscloudformation

For more information on AWS Profiles, see:
https://docs.aws.amazon.com/cli/latest/userguide/cli-multiple-profiles.html

? Do you want to use an AWS profile? Yes
? Please choose the profile you want to use default
Adding backend environment dev to AWS Amplify Console app: XXXXXXXXXXXXXX
⠏ Initializing project in the cloud...

(snip)

Your project has been successfully initialized and connected to the cloud!

Some next steps:
"amplify status" will show you what you've added already and if it's locally configured or deployed
"amplify add <category>" will allow you to add features like user login or a backend API
"amplify push" will build all your local backend resources and provision it in the cloud
“amplify console” to open the Amplify Console and view your project status
"amplify publish" will build all your local backend and frontend resources (if you have hosting category added) and provision it in the cloud

Pro tip:
Try "amplify add api" to create a backend API and then "amplify publish" to deploy everything

$
行の色が薄くなっている箇所が、入力の必要なところになります。
基本は書かれている通りに入力したり、カーソルキーで選択肢を選んだり、とするだけです。
続いて、 Amplify の Hosting 機能をプロジェクトに追加します。
$ amplify add hosting
? Select the plugin module to execute Hosting with Amplify Console (Managed hosting with custom domains, Continuous deployment)
? Choose a type Continuous deployment (Git-based deployments)
? Continuous deployment is configured in the Amplify Console. Please hit enter once you connect your repository
Amplify hosting urls:
┌──────────────┬──────────────────────────────────────────────┐
│ FrontEnd Env │ Domain                                       │
├──────────────┼──────────────────────────────────────────────┤
│ master       │ https://master.XXXXXXXXXXXXXX.amplifyapp.com │
└──────────────┴──────────────────────────────────────────────┘
$
こちらは最初の選択で Hosting with Amplify Console を、二つ目の選択で Continuous deployment (Git-based deployments) を選びます。
すると、ブラウザで Amplify Console が開きます。
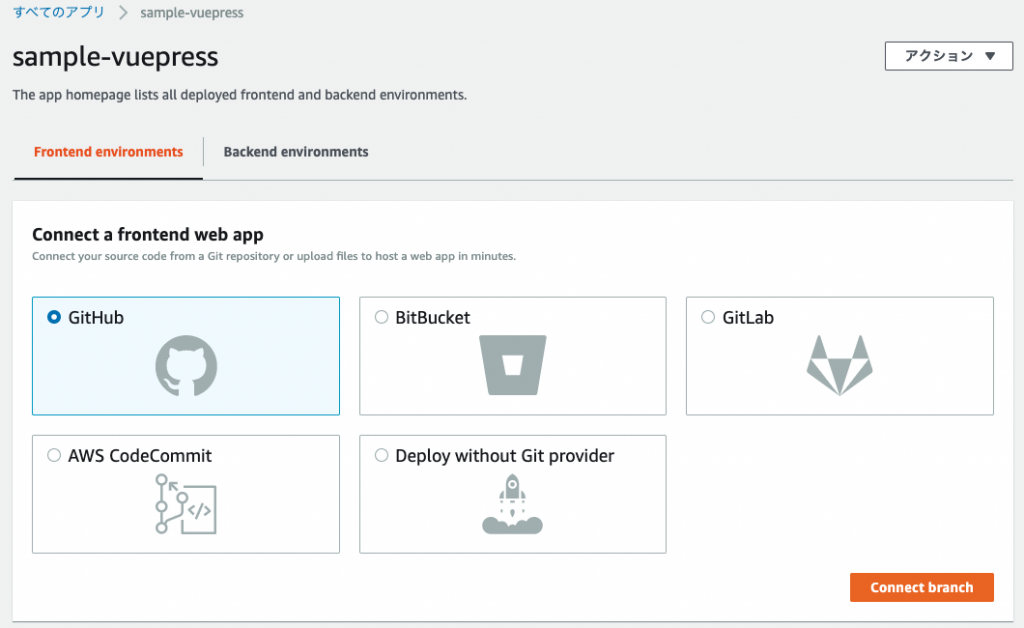
接続する Git サービスを選択する画面になるので、今回は GitHub を選択して connect branch をクリックします。
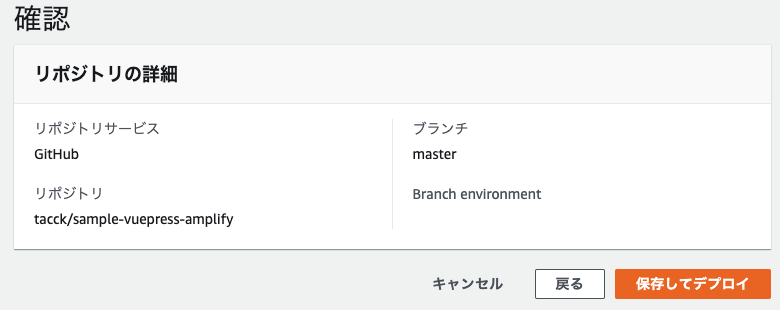
続いて、 Amplify と接続するリポジトリとブランチを選択する画面に移ります。
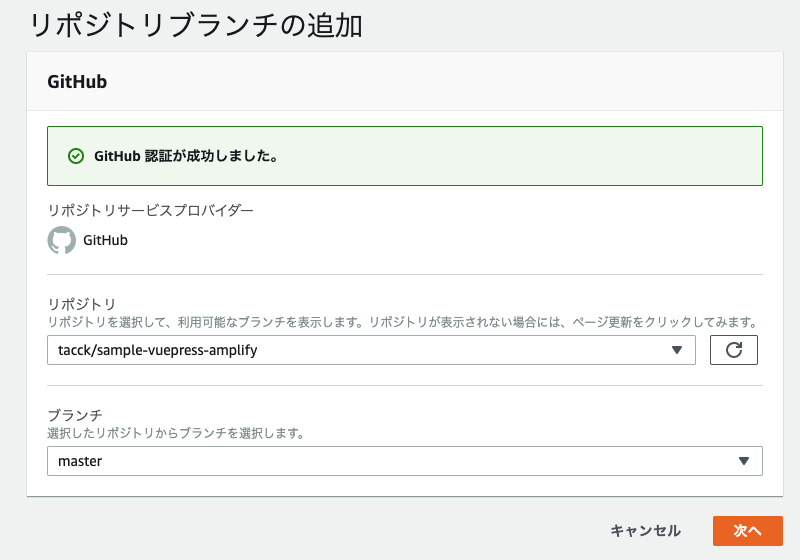
先ほど使ったリポジトリである tacck/sample-vuepress-amplify を選択し、 master ブランチを選択します。
選択できたら 次へ ボタンをクリックします。
ビルド設定の構成画面に移ります。
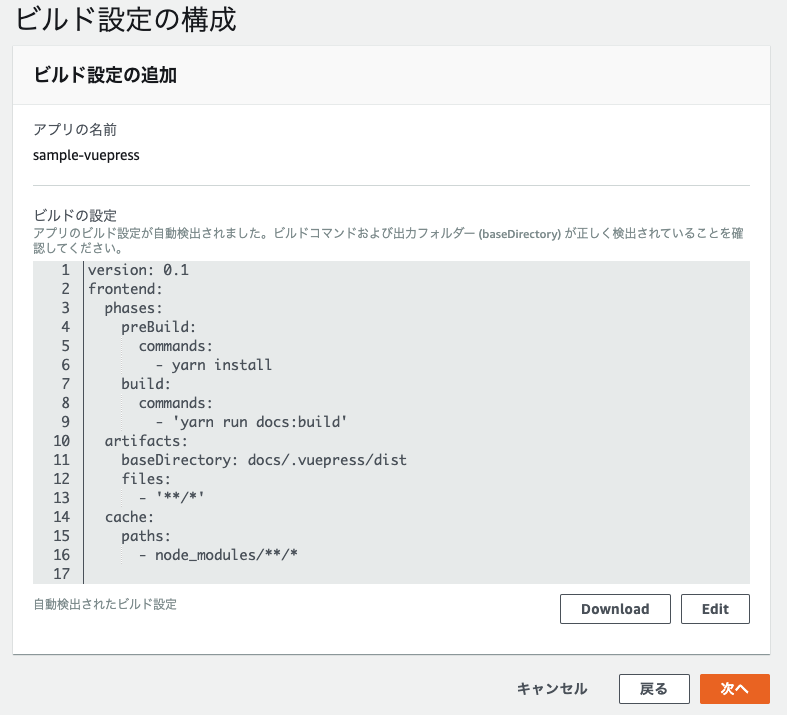
ここは特に変更するところはありません。(事前に CLI で設定していた通りになっているはずです。)
このまま 次へ ボタンをクリックします。
確認画面に移るので、 保存してデプロイ ボタンをクリックしましょう。
Amplify のプロジェクト画面に戻ってきます。
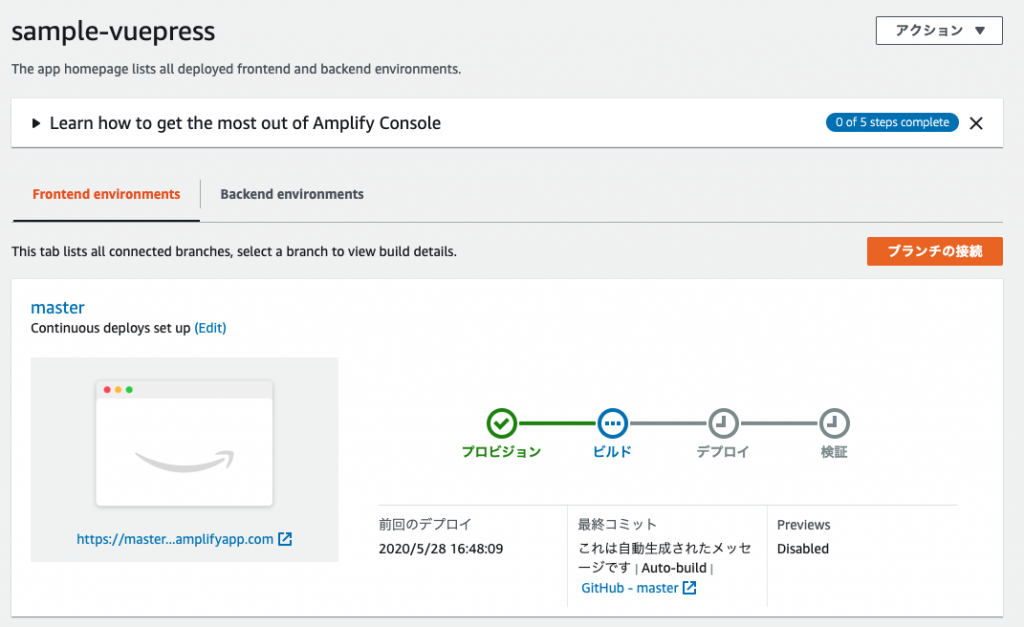
自動でビルドやデプロイが行なわれていく様子を見守りましょう。
オールグリーンになったら、無事にデプロイまでできました!
では、デプロイされたサイトを確認しましょう。
コンソールの左側にある https://master...amplifyapp.com となっているところをクリックしましょう。(ブラウザでは正しいURLになっています。)
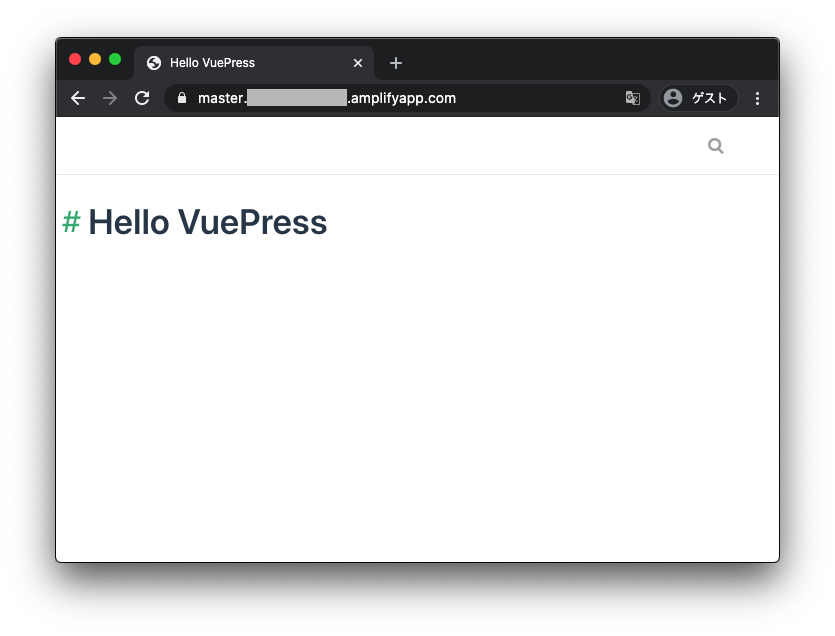
ローカルでの確認と同じように、うまく表示されていますね!
このように、Webサイトのデプロイを簡単に行なえることがわかったと思います。
Amplify Hosting の (同種のサービスと比較しての) 大きな特徴として Basic認証 を標準で設定することができる、というのがあります。
開発途中のWebサイトなのでコンプライアンス的にオープンな場所に置けない、というプロジェクトでも安心ですね。
設定方法もとても簡単です。
Amplify Console の左側のメニューから アクセスコントロール とあるので、こちらをクリックしてください。
(メニューが出ていなかったら、左側のエリアをクリックしてみてください。)
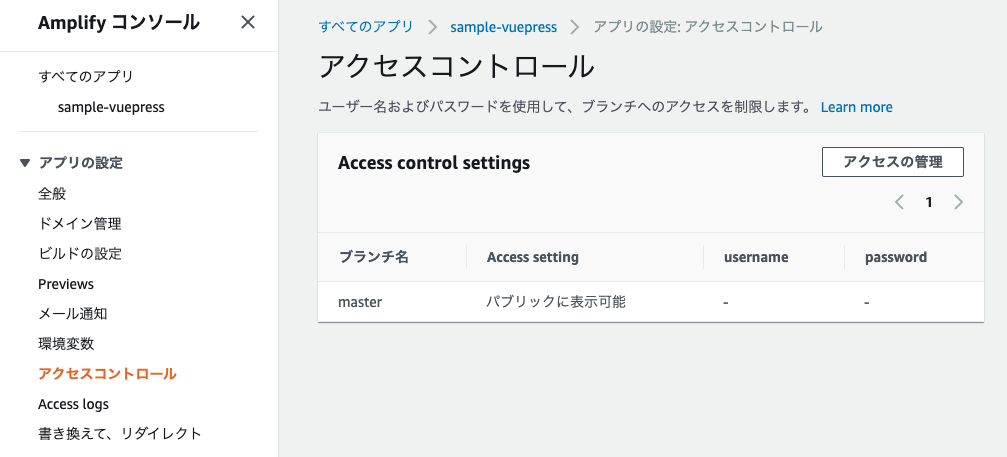
現在 ブランチ名: master が Access setting: パブリックに表示可能 となっていますね。
つまり、誰でもこのサイトを閲覧することができる状態、ということです。
では、 Basic認証 を設定してみましょう。アクセスの管理 をクリックします。
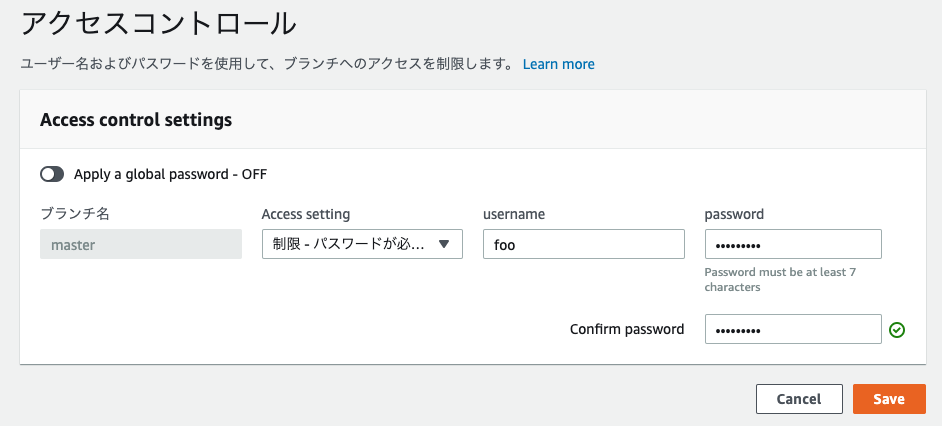
Access setting に 制限 を選ぶと、 username と password を入力できるようになります。
ここに、 Basic認証で使うユーザー名とパスワードを入力してください。
設定できたら、 Save ボタンをクリックしましょう。
はい、これで Basic認証 の設定はおしまいです。
先ほど開いたデプロイ済みのWebサイトを、もう一度開いてみます。
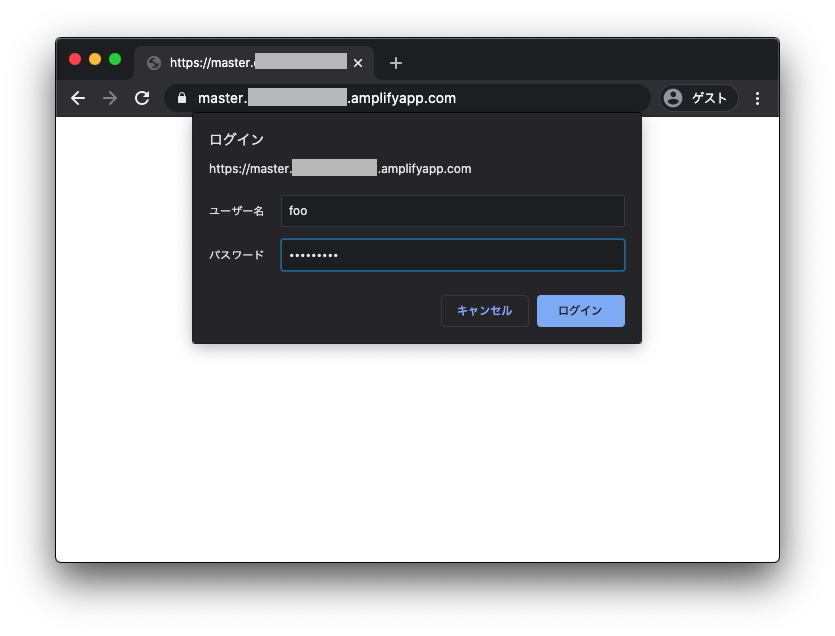
Basic認証 のログインダイアログが出てきました!
ここに、上記で設定したユーザー名とパスワードを入力し、 ログイン ボタンをクリックしてみましょう。
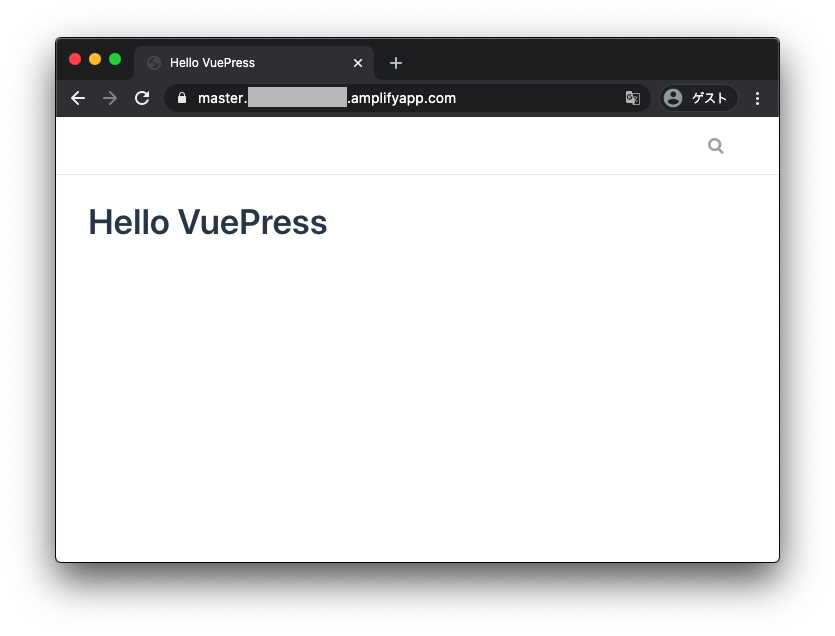
きちんと VuePress で作ったページが表示されましたね。
さて、せっかく GitHub と連携したので、 git push したら自動でサイトが更新されるところも確認しておきましょう。
docs/README.md ファイルを、下記のように更新しましょう。
# Hello VuePress

Amplify is GREAT!
更新できたら、下記のようにいつもの手順で git add し git commit し git push します。
$ git add docs/README.md
$ git commit -m "amplify is great"
[master f8fa3ca] amplify is great
 1 file changed, 2 insertions(+)
$ git push
Enumerating objects: 7, done.
Counting objects: 100% (7/7), done.
Delta compression using up to 4 threads
Compressing objects: 100% (2/2), done.
Writing objects: 100% (4/4), 432 bytes | 216.00 KiB/s, done.
Total 4 (delta 0), reused 0 (delta 0), pack-reused 0
To https://github.com/tacck/sample-vuepress-amplify.git
   62fe306..f8fa3ca  master -> master
$
Amplify Console をみると、再びビルドやデプロイを行ない始めているはずです。
しばらく見守って無事にオールグリーンになったら、もう一度Webサイトを開いてみましょう。
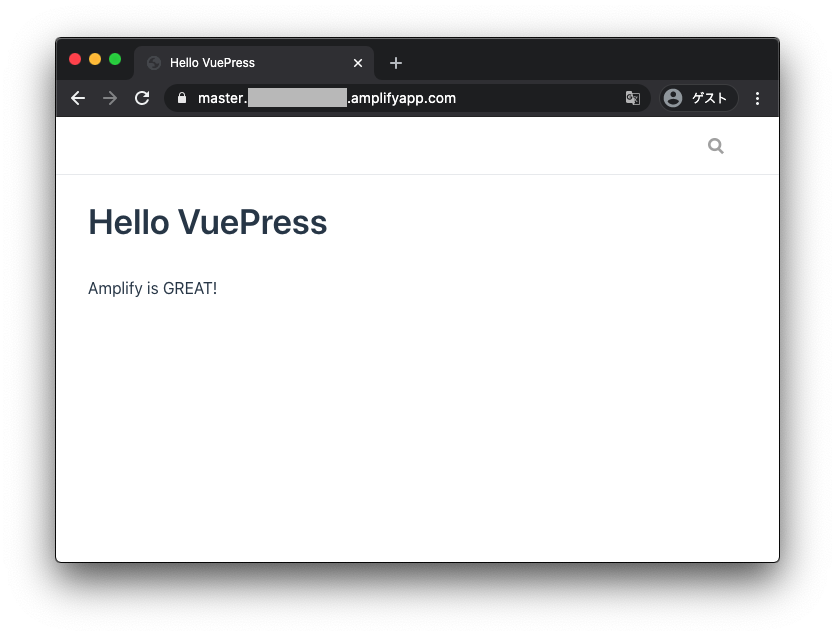
追加した部分が、きちんと自動で反映されています!
Amplify Hosting と同じような機能をもつサービスは、他にもたくさんあります。
単なる静的サイトを公開する、という点ではほとんどのサービスで同等だと思います。
一方、今回紹介した Basic認証 を標準で(ほぼ無料〜安価に)提供してくれるのは、 Amplify Hosting の大きなメリットです。
また、Amplify Hosting は、他にある Amplify の機能を手軽に使えることが、大きな選択理由になってくると思います。
次回以降、その他の機能についても少しずつ紹介していきたいと思います。

![]()